TechSansar.com
  • Services
  • Top Posts
  • Nepali IT
  • Startups
  • Tech News
  • Categories
    • News
      • Wellness
      • Lifestyle
      • Culture
      • Tech
      • Sport
No Result
View All Result
TechSansar.com
  • Services
  • Top Posts
  • Nepali IT
  • Startups
  • Tech News
  • Categories
    • News
      • Wellness
      • Lifestyle
      • Culture
      • Tech
      • Sport
No Result
View All Result
TechSansar.com

Shrinking a partition by using the GUI : Shrinking a Partition in Windows 7/ 2010 server- Part II

15 years ago
in Tips & Tricks, Tutorials, Windows-7
Reading Time: 12 mins read
A A
0

Related Post

Spring Cleaning: 10 tips to get a fresh start on online safety from Google

Website blacklisted or "not safe to visit" by Google? Here is how to fix & stop badwares. (Experience Sharing)

YouTube Offline is now available in Nepal – how to use offline YouTube feature.

Creating custom run commands to speed up access in Windows 7 & beyond

Please, read volume I of this article before proceeding since there’s a little background of How to handle partitioning and related issued in Windows Vista.
This is a complete visual guide to how to re-partition or shrink the Hard disk drive in Windows Vista.
Follow these steps, ensure your notebook’s on AC supply, BE COOL. Click the screenshots below to enlarge them (open in new window), save the screenshots of Shrinking partition if you want, then you’re on the track. All the Best!

It took us just few minutes if not seconds if you’re going for few gigs, but in our case it’s more than 100 gigs though it took us only about 72 seconds.
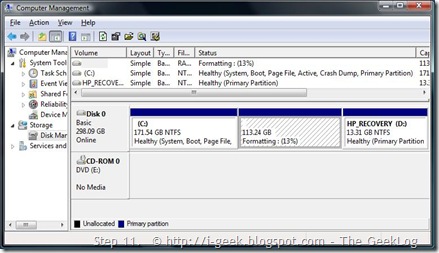
However, it took about a 3-quarter hour to format the shrinked new partition of 117GB in NTFS.

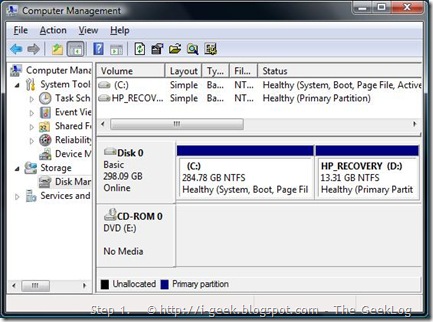
Step 1.

  • Ensure you have Administrative credentials, In Windows Vista, go to Control Panel > System and Maintenance > Administrative Tools, or on the My Computer context menu. Select Computer Management. In Vista, if you are prompted for an administrator password or confirmation, type the password or provide confirmation.
  • In Windows Server 2008 you need to go to Server Manager, found in the Administrative Tools folder or on the My Computer context menu.
  1. Next, scroll down till you get to the Storage section, and in it go to the Disk Management console.
  1. Select the disk you want to shrink, for example Drive C, as in our case.

Note: Shrinking any volume is fine as long as you make sure you leave enough space on the partition you are shrinking. For example, having a 40 GB system partition might seem too much at the beginning, but after a while you might find it to be less than optimal. You see, many applications such as Microsoft Office take tons of free space. So do Service Packs, hotfixes and other files. For a server running Windows Server 2008 this calculation might be different than on a workstation running Windows Vista, but in any case, make a mental note of this BEFORE shrinking your partitions.
vista partition1
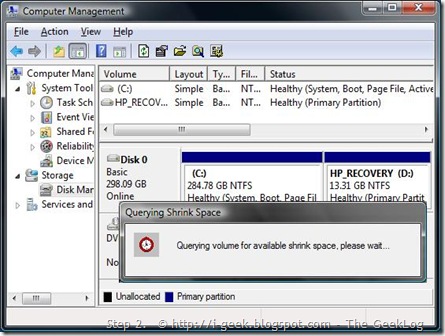
Step 2.
Quering volume for available shrink space, right click to query the partition it’s C: in here.
vista partition2
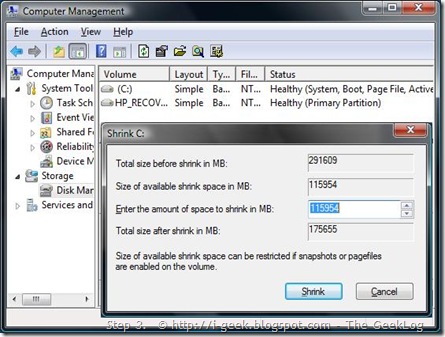
Step 3.
Disk Management showing the wizard to enter the amount of space to shrink in MB. Size of available shrink space can be restricted if snapshots or pagefiles are enabled on the volume.
Click Shrink to use the maximum allowable amount of space.
vista partition3
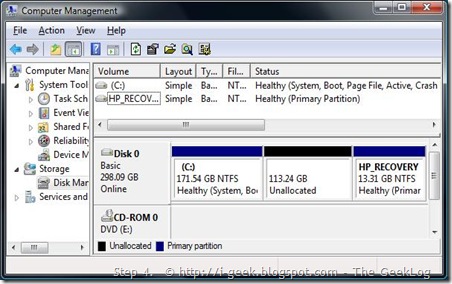
Step 4.
After clicking the Shrink button, a new unallocated space is visible, it’s 113.24 GB in here.
vista partition4
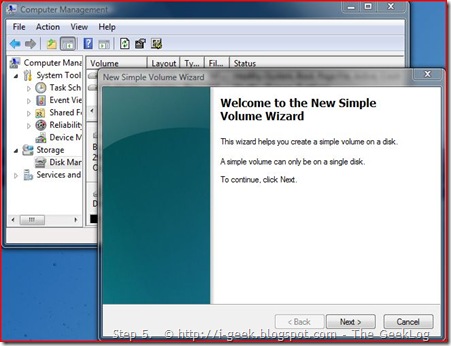
Step 5.
Now you might want to format the newly created partition on your Windows Vista. Creating a new volume in the space available after shrinking. The wizard helps you create a simple volume on  a disk.
vista partition5
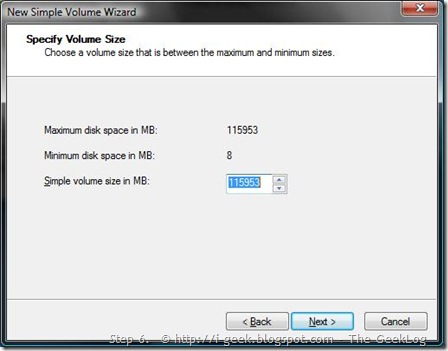
Step 6.
Specifying the Volume Size to create a new partition.
vista partition6
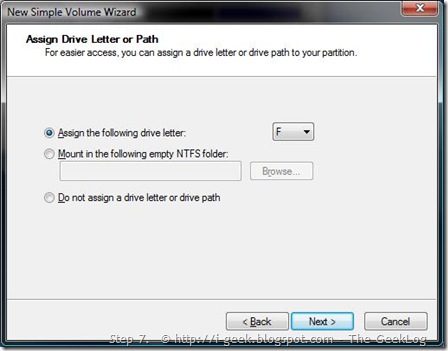
Step 7.
Assign the drive letter
vista partition7
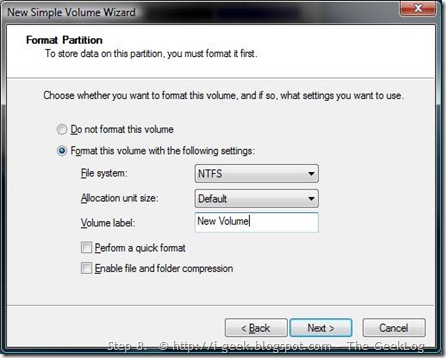
Step 8.
Partition format wizard: format as per your need of the file system NTFS or FAT, and assign a new name or volume label to it.
vista partition8
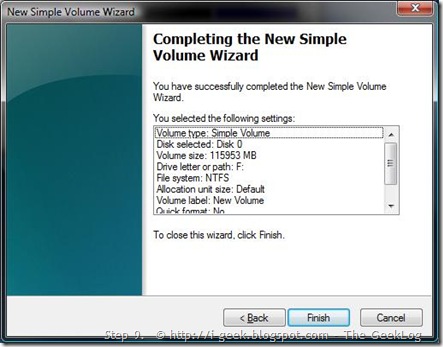
Step 9.
Click Finish to process formatting.
vista partition9
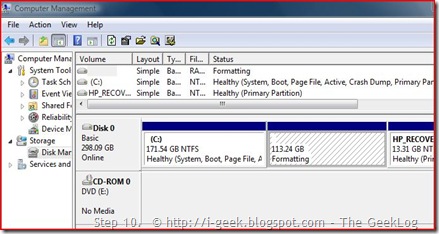
Step 10.
Formatting..
vista partition10
Step 11.
Formatting the new partition (result of shrinking), formatting is your Choice in NTFS (recommended) or FAT32.
vista partition11
Finally, You will have successfully created a new partition out of the freed space.
Hope this will solve your queries. Since the screenshots are real time capture @ our workshop, they are self-explanatory and will assist you a lot.
Please, read the volume III edition of this article : Shrinking a partition by using the CommandLine : Shrinking a Partition in Windows Vista/2008 – Part III
Read Volume I of this article: Shrinking a Partition in Windows Vista/2008 I : Read before you Act
*** Originally published by i-geek blog at http://i-geek.blogspot.com/2008/07/shrinking-partition-in-windows.html

Tags: Tips & TricksTutorials
Share212Tweet133Send

Related Posts

10 online safety tips by Google
Tips & Tricks

Spring Cleaning: 10 tips to get a fresh start on online safety from Google

It's Spring. Spring 2016 already. And Google wants to make online safety even better with spring cleaning time campaign -...

by ts
March 30, 2016
Tips & Tricks

Website blacklisted or "not safe to visit" by Google? Here is how to fix & stop badwares. (Experience Sharing)

Everyday thousands of websites are blacklisted by Google's automated system to make Internet a better place. This practice is indeed...

by ts
December 17, 2015

Recent News

Highlights of Nepal Digital Budget 2082-83

Nepal Digital Budget 2082/83: AI, Startups, 5G, and the Tech Roadmap Ahead

May 30, 2025
Screenshot from a desktop computer showing existing services offered by Nagarik App; image by TechSansar.com

Nagarik App Integrates National Identity Card: A Leap Towards Comprehensive E-Governance

January 24, 2025
All .np domain owners are required to reverify their domain names.

The Great Reverification: What Nepal’s .np Domain Owners Need to Know

January 5, 2025
Microsoft Forms Sync Update

Microsoft Forms Sync Update: Adapting to Microsoft’s New Approach for Excel Integration

January 3, 2025
Free PDFTools
Free PDFTools

Nice one!

Categories

  • Applications
  • Computing
  • Culture
  • Entertainment
  • Environment
  • Event
  • Featured
  • How To
  • Internetworking
  • Lifestyle
  • Nepali IT
  • News
  • Social Networking
  • Software
  • Sport
  • Tech
  • Tech News
  • Telecom
  • Travel
  • Uncategorized
  • Wellness
  • News
  • Lifestyle
  • Entertainment
  • Tech
  • Sport
  • Culture
  • Wellness
  • Event
  • Travel
  • Environment

TechSansar.com, ICT For Media Pvt Ltd, Regd #249079/077/078, VAT #609868175.
By continuing to use this site, you agree to our cookies and privacy policies.
Here is our Do Not Track (DNT) Guide. Hosted on a VPS in Singapore and uses this beautiful WordPress theme. You can also subscribe to our newsletter.
Creating tech contents for the b̶o̶t̶s̶ humans since 2009 • Team TechSansar • ICT4M with ❤ from Nepal

Welcome Back!

Login to your account below

Forgotten Password?

Retrieve your password

Please enter your username or email address to reset your password.

Log In
No Result
View All Result
  • Home
  • Shop peripherals
  • Buy softwares
  • Top websites
  • Contact us

TechSansar.com, ICT For Media Pvt Ltd, Regd #249079/077/078, VAT #609868175.
By continuing to use this site, you agree to our cookies and privacy policies.
Here is our Do Not Track (DNT) Guide. Hosted on a VPS in Singapore and uses this beautiful WordPress theme. You can also subscribe to our newsletter.
Creating tech contents for the b̶o̶t̶s̶ humans since 2009 • Team TechSansar • ICT4M with ❤ from Nepal