• Login
  • Register
Monday, July 13, 2026
Generate QR Codes
Free PDF Tools
Free Web Audit 360
TechSansar.com
  • Services
  • Top Posts
  • Nepali IT
  • Startups
  • Tech News
  • Categories
    • News
      • Tech
No Result
View All Result
TechSansar.com
  • Services
  • Top Posts
  • Nepali IT
  • Startups
  • Tech News
  • Categories
    • News
      • Tech
No Result
View All Result
TechSansar.com

Shrinking a partition by using the GUI : Shrinking a Partition in Windows 7/ 2010 server- Part II

ts by ts
February 7, 2010
in Tips & Tricks, Tutorials
A A
0

Please, read volume I of this article before proceeding since there’s a little background of How to handle partitioning and related issued in Windows Vista.
This is a complete visual guide to how to re-partition or shrink the Hard disk drive in Windows Vista.
Follow these steps, ensure your notebook’s on AC supply, BE COOL. Click the screenshots below to enlarge them (open in new window), save the screenshots of Shrinking partition if you want, then you’re on the track. All the Best!

It took us just few minutes if not seconds if you’re going for few gigs, but in our case it’s more than 100 gigs though it took us only about 72 seconds.
However, it took about a 3-quarter hour to format the shrinked new partition of 117GB in NTFS.

Step 1.

Related Post

How to reduce background noise during Microsoft Teams or Zoom meetings

6 simple yet effect ways to speed up your Windows 10 computer

Remove add-in services from Outlook, LeadBoxer as an example

12 productivity keyboard shortcuts for Microsoft Teams

  • Ensure you have Administrative credentials, In Windows Vista, go to Control Panel > System and Maintenance > Administrative Tools, or on the My Computer context menu. Select Computer Management. In Vista, if you are prompted for an administrator password or confirmation, type the password or provide confirmation.
  • In Windows Server 2008 you need to go to Server Manager, found in the Administrative Tools folder or on the My Computer context menu.
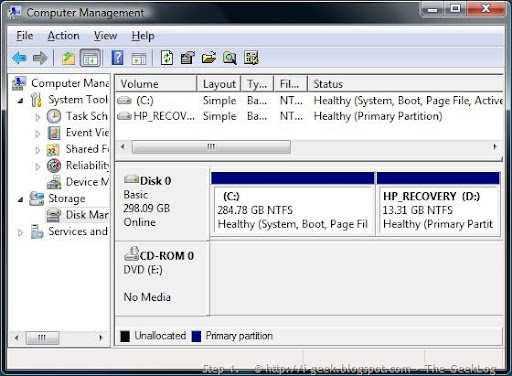
  1. Next, scroll down till you get to the Storage section, and in it go to the Disk Management console.
  1. Select the disk you want to shrink, for example Drive C, as in our case.

Note: Shrinking any volume is fine as long as you make sure you leave enough space on the partition you are shrinking. For example, having a 40 GB system partition might seem too much at the beginning, but after a while you might find it to be less than optimal. You see, many applications such as Microsoft Office take tons of free space. So do Service Packs, hotfixes and other files. For a server running Windows Server 2008 this calculation might be different than on a workstation running Windows Vista, but in any case, make a mental note of this BEFORE shrinking your partitions.
vista partition1
Step 2.
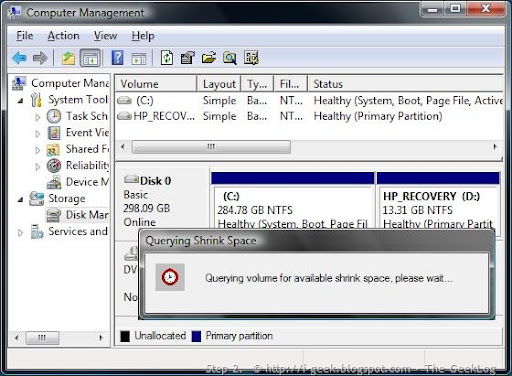
Quering volume for available shrink space, right click to query the partition it’s C: in here.
vista partition2
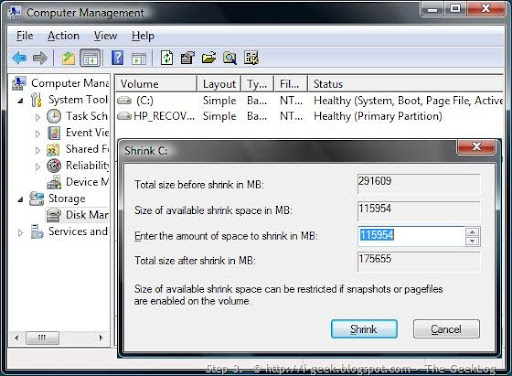
Step 3.
Disk Management showing the wizard to enter the amount of space to shrink in MB. Size of available shrink space can be restricted if snapshots or pagefiles are enabled on the volume.
Click Shrink to use the maximum allowable amount of space.
vista partition3
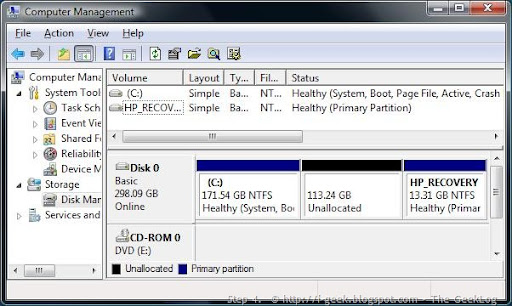
Step 4.
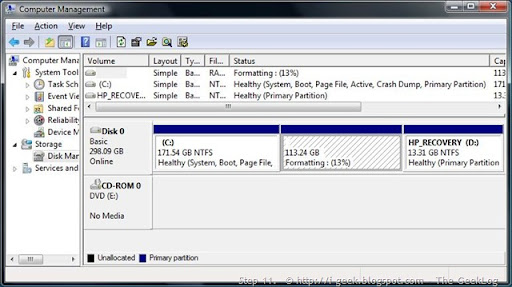
After clicking the Shrink button, a new unallocated space is visible, it’s 113.24 GB in here.
vista partition4
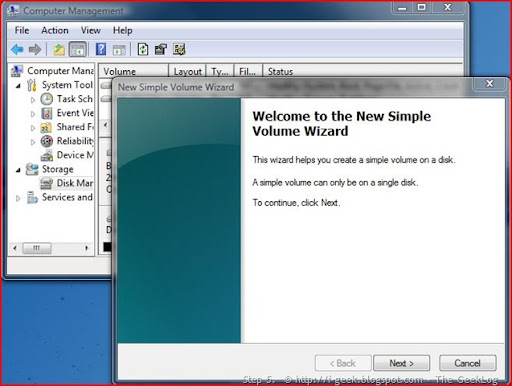
Step 5.
Now you might want to format the newly created partition on your Windows Vista. Creating a new volume in the space available after shrinking. The wizard helps you create a simple volume on  a disk.
vista partition5
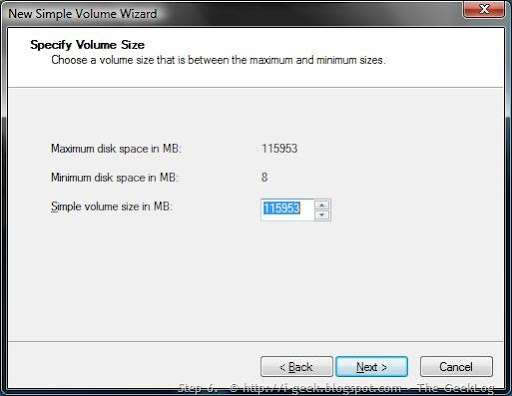
Step 6.
Specifying the Volume Size to create a new partition.
vista partition6
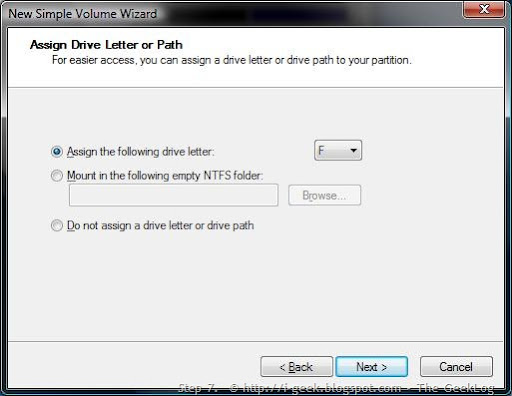
Step 7.
Assign the drive letter
vista partition7
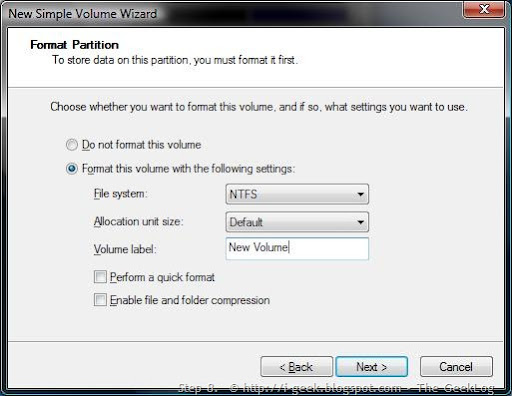
Step 8.
Partition format wizard: format as per your need of the file system NTFS or FAT, and assign a new name or volume label to it.
vista partition8
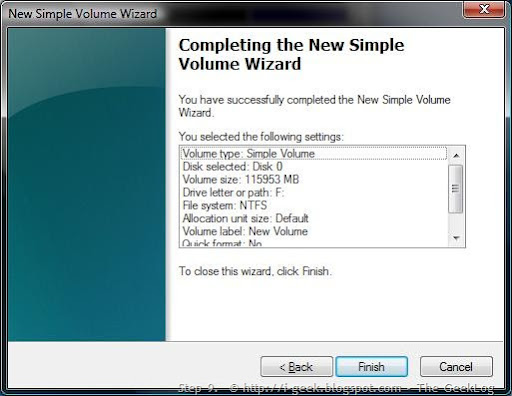
Step 9.
Click Finish to process formatting.
vista partition9
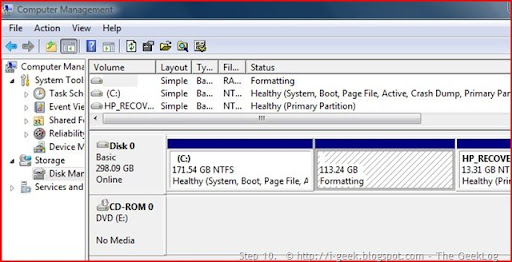
Step 10.
Formatting..
vista partition10
Step 11.
Formatting the new partition (result of shrinking), formatting is your Choice in NTFS (recommended) or FAT32.
vista partition11
Finally, You will have successfully created a new partition out of the freed space.
Hope this will solve your queries. Since the screenshots are real time capture @ our workshop, they are self-explanatory and will assist you a lot.
Please, read the volume III edition of this article : Shrinking a partition by using the CommandLine : Shrinking a Partition in Windows Vista/2008 – Part III
Read Volume I of this article: Shrinking a Partition in Windows Vista/2008 I : Read before you Act
*** Originally published by i-geek blog at http://i-geek.blogspot.com/2008/07/shrinking-partition-in-windows.html

Tags: Tips & TricksTutorials
Share212Tweet133Send
Previous Post

Shrinking a Partition in Windows 7/2010 Server I : Read before you Act

Next Post

Shrinking a partition by using the command line : Shrinking a Partition in Windows 7/2010 server – Part III

Related Posts

Reduce background noise during Microsoft Teams or Zoom meetings
How To

How to reduce background noise during Microsoft Teams or Zoom meetings

In this tutorial, we present how to reduce external noise from your microphone during Microsoft Teams and Zoom sessions. We...

by TechSansar Editor
May 20, 2021
Speed up pc
How To

6 simple yet effect ways to speed up your Windows 10 computer

With the latest update or with Microsoft Windows in general, your pc might run slow over the time of gradual...

by TechSansar Editor
February 2, 2021

Recent News

Gen Z Protest Kathmandu 2025

July 4, 2026
The Launch That Moved Syuchatar: YetiCloud.AI and the Night Nepal’s Compute Policy Went Public

The Launch That Moved Syuchatar: YetiCloud.AI and the Night Nepal’s Compute Policy Went Public

July 4, 2026
Illustrating Sovereign AI Compute in Nepal Syuchatar with circuitary

Syuchatar in Regional Context: A Policy Commentary on Sovereign AI Compute

May 31, 2026
Technical explainer on Nepal's announced Sovereign AI Compute Center at Syuchatar. What Budget 2083/84 specified, what it didn't, and the four design questions that decide its outcome.

Nepal’s Sovereign AI Compute Center at Syuchatar: A Technical Explainer

May 30, 2026
Hostinger
  • News
  • Tech
  • Event
Generate free QR Codes with QRSansar

TechSansar.com, ICT For Media Pvt Ltd, Regd #249079/077/078, VAT #609868175.
By continuing to use this site, you agree to our cookies and privacy policies.
Here is our Do Not Track (DNT) Guide. Hosted on a VPS and uses this free PDF tool. You can also subscribe to our newsletter.
Creating tech contents for the b̶o̶t̶s̶ humans since 2009 • Team TechSansar • ICT4M with ❤ from Nepal

Welcome Back!

Login to your account below

Forgotten Password? Sign Up

Create New Account!

Fill the forms below to register

All fields are required. Log In

Retrieve your password

Please enter your username or email address to reset your password.

Log In
No Result
View All Result
  • Home page
  • Shop peripherals
  • Buy software
  • Featured articles
  • My account

TechSansar.com, ICT For Media Pvt Ltd, Regd #249079/077/078, VAT #609868175.
By continuing to use this site, you agree to our cookies and privacy policies.
Here is our Do Not Track (DNT) Guide. Hosted on a VPS and uses this free PDF tool. You can also subscribe to our newsletter.
Creating tech contents for the b̶o̶t̶s̶ humans since 2009 • Team TechSansar • ICT4M with ❤ from Nepal